Difference between revisions of "ExportToWeb"
AngelHerraez (talk | contribs) (→Newer Jmol versions) |
AngelHerraez (talk | contribs) (smaller images and text update) |
||
| (One intermediate revision by the same user not shown) | |||
| Line 1: | Line 1: | ||
= Jmol Export to Web application = | = Jmol Export to Web application = | ||
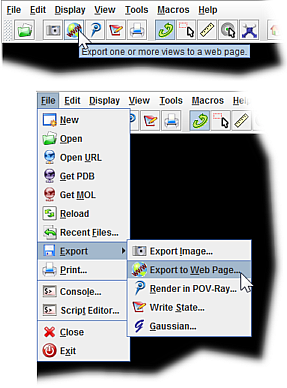
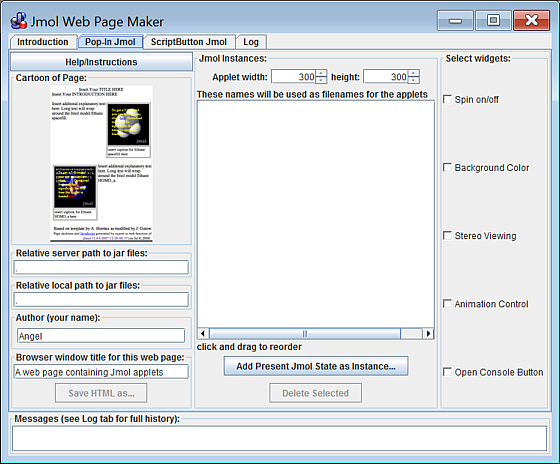
| − | "Export to Web" (a.k.a. Jmol Web Page Maker) is a module included in the [[Jmol Application]]. Its purpose is to offer a user-friendly, basic, easy to learn way of producing simple webpages that include [[Jmol Applet]] | + | "Export to Web" (a.k.a. Jmol Web Page Maker) is a module included in the [[Jmol Application]]. Its purpose is to offer a user-friendly, basic, easy to learn way of producing simple webpages that include [[Jmol Applet|JSmol objects]] with molecular views that the user has prepared but still retain full-featured Jmol interactivity. |
| − | [[File: | + | [[File:ExportToWeb_opening_75.png]] [[File:ExportToWeb_window_75.png]] |
| − | == | + | == Preparations == |
| − | + | You need to do some extra preparation before E2W will work successfully. | |
# Create a folder where you will work with E2W. | # Create a folder where you will work with E2W. | ||
| Line 18: | Line 18: | ||
[[File:File_set_minimal.png]] | [[File:File_set_minimal.png]] | ||
| − | == | + | Then, in the Export to Web dialog, under "Relative server path..." and "Relative local path..." you should enter the path to this {{folder|jsmol}} folder starting from the folder where you are saving your webpage (html file). |
| − | + | ||
| + | Note that the location of {{folder|jsmol}} in your '''local disk (for page testing)''' and in your '''web server (for visitors of your pages)''' need not be the same; that's why the dialog has two separate lines. | ||
| + | |||
| + | == Legacy Jmol versions == | ||
| + | Due to changes in the distribution file scheme that started with Jmol v. 13.2 (associated to the evolution towards [[Jmol_JavaScript_Object|Jmol-JSO and JSmol]]), the preparation procedures were different in former versions of Jmol: | ||
Make sure to extract (unzip) the whole contents of the downloaded Jmol distribution file, and to work with the {{file|Jmol.jar}} in that folder. | Make sure to extract (unzip) the whole contents of the downloaded Jmol distribution file, and to work with the {{file|Jmol.jar}} in that folder. | ||
| + | |||
| + | With Jmol versions before 13.2, the use of E2W is described in Jonathan Gutow's tutorial [http://www.uwosh.edu/faculty_staff/gutow/Jmol_Web_Page_Maker/Export_to_web_tutorial.shtml in English] (y [http://biomodel.uah.es/Jmol/exporta_a_web/ en español]). | ||
Latest revision as of 16:06, 15 September 2018
Jmol Export to Web application
"Export to Web" (a.k.a. Jmol Web Page Maker) is a module included in the Jmol Application. Its purpose is to offer a user-friendly, basic, easy to learn way of producing simple webpages that include JSmol objects with molecular views that the user has prepared but still retain full-featured Jmol interactivity.
Preparations
You need to do some extra preparation before E2W will work successfully.
- Create a folder where you will work with E2W.
- Download the distribution file,
 Jmol-14.x.x-binary.zip and extract its contents: a
  jmol-14.x.x folder will be created by default.
- Unzip the
 jsmol.zip; it will create a
  jsmol folder with several folders inside.
- Go to your working folder, launch
 Jmol.jar and then you can load models and open the Export to Web module.
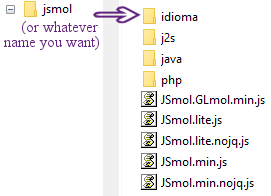
Note: not all contents of ![]() jsmol are needed; you must keep
jsmol are needed; you must keep ![]() JSmol.min.js and all the other
JSmol.min.js and all the other ![]() .js files, but among the subfolders, you can keep just
.js files, but among the subfolders, you can keep just ![]() idioma,
idioma, ![]() java,
java, ![]() j2s and
j2s and ![]() php.
php.
Then, in the Export to Web dialog, under "Relative server path..." and "Relative local path..." you should enter the path to this ![]() jsmol folder starting from the folder where you are saving your webpage (html file).
jsmol folder starting from the folder where you are saving your webpage (html file).
Note that the location of ![]() jsmol in your local disk (for page testing) and in your web server (for visitors of your pages) need not be the same; that's why the dialog has two separate lines.
jsmol in your local disk (for page testing) and in your web server (for visitors of your pages) need not be the same; that's why the dialog has two separate lines.
Legacy Jmol versions
Due to changes in the distribution file scheme that started with Jmol v. 13.2 (associated to the evolution towards Jmol-JSO and JSmol), the preparation procedures were different in former versions of Jmol:
Make sure to extract (unzip) the whole contents of the downloaded Jmol distribution file, and to work with the ![]() Jmol.jar in that folder.
Jmol.jar in that folder.
With Jmol versions before 13.2, the use of E2W is described in Jonathan Gutow's tutorial in English (y en español).


