Internationalisation
- Getting Involved in J(S)mol evolution
- Release Procedures
- Developing J(S)mol with Eclipse
- Internationalisation (status)
- MultiUser Jmol
- Developer mailing list (mirror)
Jmol Internationalisation and Localisation
Several pieces of Jmol can be translated into your local language:
Contents
Translating this Wiki
The articles in this Wiki can be translated into your own language.
The explanation below will take two different situations:
- When the page you want to translate is already translated into an other language.
- When the page you want to translate is not translated into any other language.
We will suppose in the explanation that you want to translate a page named English_Page into XXXXX (language code: xx).
Page already translated into an other language
- In the Template namespace, edit the existing page Lang:English_Page, add your language in it and save the page:
----
{| border="0" cellspacing="1"
|-
! valign="middle" | [[Image:Geographylogo.png]]
| valign="middle" align="left" | <span style="font-size:smaller">
Reference:
'''[[English_Page|English]]''' â
Other:
<!--es-->[[English_Page/es|Español]] ·
<!--fr-->[[English_Page/fr|Français]] ·
<!--xx-->[[English_Page/xx|XXXXX]] ·
</span>
|}
----
- Edit the English_Page to have the source code of the page, copy the entire source code (Ctrl+A, Ctrl+C) and cancel the page editing.
- Start editing the page in your language (English_Page/xx), paste the source code (Ctrl+V) and then translate the page.
Page not translated into any other language
- Edit the template page (Template:Lang:English_Page) and initialize it:
----
{| border="0" cellspacing="1"
|-
! valign="middle" | [[Image:Geographylogo.png]]
| valign="middle" align="left" | <span style="font-size:smaller">
Reference:
'''[[English_Page|English]]''' â
Other:
<!--xx-->[[English_Page/xx|XXXXX]] ·
</span>
|}
----
- Edit the English_Page, insert {{Lang:English_Page}} at the beginning, copy the entire source code (Ctrl+A, Ctrl+C) and save the page.
- Start editing the page in your language (English_Page/xx), paste the source code (Ctrl+V) and then translate the page.
Translating the application/applet
In Jmol version 10.00.12 we changed from an unhandy (but well-known) translation process to a more powerful one using GNU's gettext suite. The following paragraphs contain a detailed explanation of this process. More documentation is available here.
See the current status of the translations.
Simple explanation to add a new translation
Adding a new translation for the Jmol application/applet is quite easy. Only a few steps are required to add the translation.
1. Download the files for the translation:
Download Jmol.pot and rename it to ![]() LANG.po.
LANG.po.
Download JmolApplet.pot and rename it to ![]() LANG.po.
LANG.po.
Note: LANG means your language code: e.g. de for German, fr for French and so on.
Note: Since both files have the same name, you will have to save them in different directories or rename them.
2. Install an editor for .po files:
The .po files can be edited with many editors, see Detailed explanation.
It's probably easier to use a dedicated editor, so the explanations below are based on poEdit, but feel free to use the editor you prefer. poEdit is cross-platform (Windows, Unix and Mac OS X).
Many other editors exist:
- kbabel,
- gtranslator,
- Emacs po-mode,
- ...
|
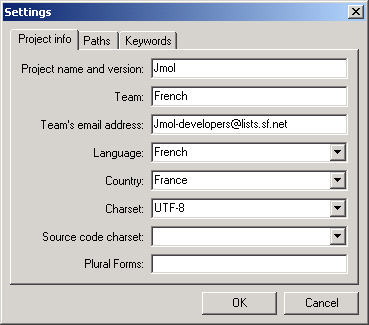
Open Jmol Select Catalog / Settings in the menu. Type the followings values in the fields:
Save the modifications |
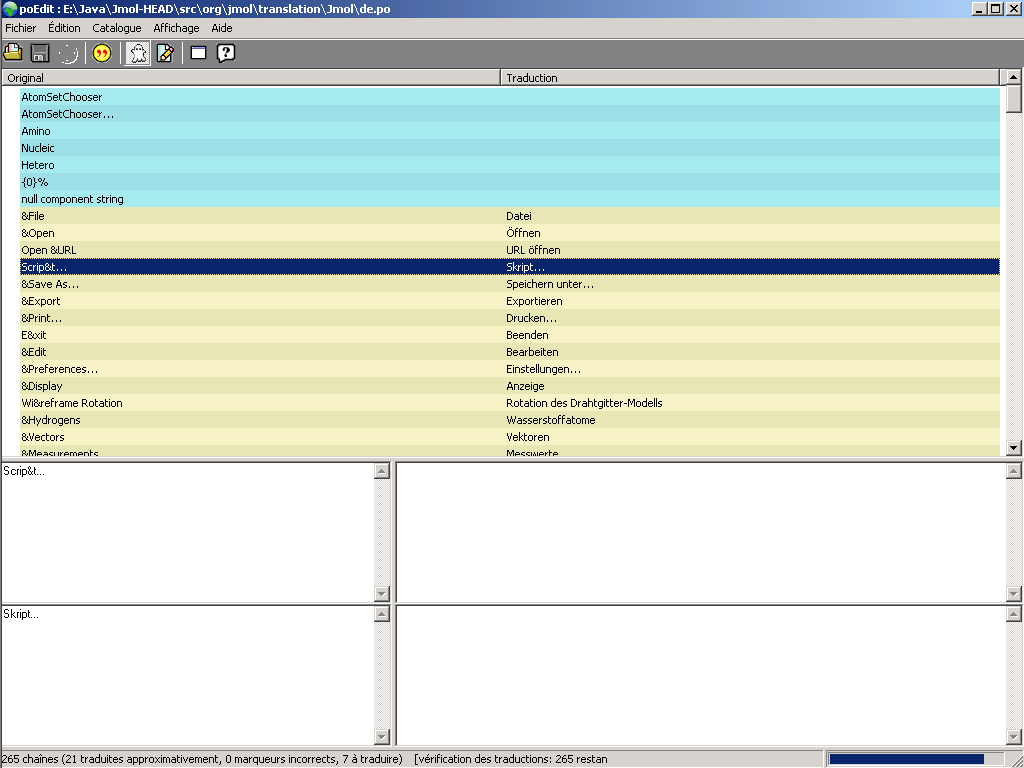
The main window of poEdit is divided into several areas.
The top area contains the list of strings to translate with their current translation. The background color of each line depends on the status of the translation:
- Blue: Not translated yet.
- Yellow: Fuzzy translation (needs verification).
- White: Translated.
- Red: Error.
When you select a line in the top area, the bottom areas is updated with the following:
- Top-left area: String to translate.
- Bottom-left area: Current translation. Just type your translation in here.
5. Repeat steps 3 and 4 with JmolApplet ![]() LANG.po.
LANG.po.
6. Send the two .po files to a Jmol developer, so they will be added in the next Jmol release.
Emails: nicove@users.sourceforge.net, Jmol-developers@lists.sf.net.
(sourceforge mail addresses may refuse mails with .zip attachments, so don't zip the files)
Simple explanation to update an existing translation
Updating an existing translation for the Jmol application/applet is quite easy. Only a few steps are required to update the translation.
1. Download the files for the translation:
Download ![]() LANG.po from the Jmol directory.
LANG.po from the Jmol directory.
Download ![]() LANG.po from the JmolApplet directory.
LANG.po from the JmolApplet directory.
Note: LANG means your language code: e.g. de for German, fr for French and so on.
Note: Since both files have the same name, you will have to save them in different directories or rename them.
2. Install an editor for .po files:
See step 2 in the explanations for adding a new translation.
See step 4 in the explanations for adding a new translation.
4. Send the two .po files to a Jmol developer, so they will be added in the next Jmol release.
Emails: nicove@users.sourceforge.net, Jmol-developers@lists.sf.net.
(sourceforge mail addresses may refuse mails with .zip attachments, so don't zip the files)
Detailed explanation
1. Download and install gettext. Linux users should try to install it using their distributions package management (like rpm, dpkg, apt, ...). Windows user download gettext from http://gnuwin32.sourceforge.net/packages/gettext.htm. Both make sure, that the gettext binaries are in your PATH environment variable.
Note for Windows users: If you installed the gettext binaries into e.g. C:\Program Files\GnuWin32, then you need to add C:\Program Files\GnuWin32\bin; to the existing PATH environment variable: Control Panel → System → Environment Variable (Tab Extended) OR run the following command in a windows command shell: set PATH=%PATH%;C:\Program Files\GnuWin32\bin;.. Windows XP and Windows 2000 are currently supported.
2. All targets related to internationalisation and localisation issues are part of ![]() build-i18n.xml. To create PO-template files, run ant -f build-i18n.xml update-pot. All
build-i18n.xml. To create PO-template files, run ant -f build-i18n.xml update-pot. All ![]() LANG.po files (which contain the translation and are maintained by the translator himself) are updated with ant -f build-i18n.xml update-po. To create the final message catalogs, run ant -f build-i18n.xml update-catalog.
LANG.po files (which contain the translation and are maintained by the translator himself) are updated with ant -f build-i18n.xml update-po. To create the final message catalogs, run ant -f build-i18n.xml update-catalog.
3. To create a translation in your language, go to src/org/jmol/translation/Jmol (for the application) or src/org/jmol/translation/JmolApplet (for the applet) and copy ![]() Jmol(Applet).pot to
Jmol(Applet).pot to ![]() LANG.po - LANG means your language code: e.g. de for German, fr for French and so on.
LANG.po - LANG means your language code: e.g. de for German, fr for French and so on.
4. To begin your translation, open the newly created ![]() LANG.po with an editor of your choice - Windows users be aware, that the editor MUST NOT add any control characters (like e.g. Word does)!. There are also specialised editors for this work: e.g. poedit, kbabel, or gtranslator.
LANG.po with an editor of your choice - Windows users be aware, that the editor MUST NOT add any control characters (like e.g. Word does)!. There are also specialised editors for this work: e.g. poedit, kbabel, or gtranslator.
5. The opened file will look like this:
# SOME DESCRIPTIVE TITLE.
# Copyright (C) YEAR THE PACKAGE'S COPYRIGHT HOLDER
# This file is distributed under the same license as the PACKAGE package.
# FIRST AUTHOR <EMAIL@ADDRESS>, YEAR.
#
These lines are comments. Adjust them and add a descritpive title, the right copyright and your name as author. Be aware, that lines beginning with #, or #: have a special meaning and are not normal comments.
#, fuzzy
msgid ""
msgstr ""
"Project-Id-Version: PACKAGE VERSION\n"
"Report-Msgid-Bugs-To: jmol-developers@lists.sourceforge.net\n"
"POT-Creation-Date: 2005-06-01 02:02+0200\n"
"PO-Revision-Date: YEAR-MO-DA HO:MI+ZONE\n"
"Last-Translator: FULL NAME <EMAIL@ADDRESS>\n"
"Language-Team: LANGUAGE <LL@li.org>\n"
"MIME-Version: 1.0\n"
"Content-Type: text/plain; charset=UTF-8\n"
"Content-Transfer-Encoding: 8bit\n"
We call this part the po-headers. The line #, fuzzy says, that the headers are outdated. Customise "Project-Id-Version: PACKAGE VERSION\n", "PO-Revision-Date: YEAR-MO-DA HO:MI+ZONE\n", "Last-Translator: FULL NAME <EMAIL@ADDRESS>\n" and maybe "Language-Team: LANGUAGE <LL@li.org>\n" (if you don't belong to a language team, then write none) and remove the fuzzy comment. In every case make sure, that Content-Type and Content-Transfer-Encoding are right (if possible, use UTF-8).
If you plan to use poedit to do the translation, you can add several lines to the headers (replace LANGUAGE and COUNTRY).
"X-Poedit-Language: LANGUAGE\n"
"X-Poedit-Country: COUNTRY\n"
"X-Poedit-Basepath: ../../../..\n"
Then begin the "real" translation:
#: org/openscience/jmol/app/AboutDialog.java:57
#: org/openscience/jmol/app/GuiMap.java:155
msgid "About Jmol"
msgstr ""

#: org/openscience/jmol/app/AboutDialog.java:67
#: org/openscience/jmol/app/HelpDialog.java:77
#: org/openscience/jmol/app/WhatsNewDialog.java:68
#, java-format
msgid "Unable to find url \"{0}\"."
msgstr ""
[..]
A line or block beginning with msgid contains the untranslated (or original) string inside double quotation marks. Above this line, you see the location entries #: path/to/file.java:line (where the string can be found in the source) and sometimes some special comments #, java-format or #, fuzzy or even #, fuzzy, java-format (telling you more about the format of a string or the state of a translation) - these lines are added and changed automatically by running ant -f build-i18n.xml update-po. Place your translation into the line or block beginning with msgstr and inside double quotation marks.
6. After finishing, add your translation (![]() LANG.po) to Jmol SVN and your language code to property all.Jmol(Applet).languages in
LANG.po) to Jmol SVN and your language code to property all.Jmol(Applet).languages in ![]() build-i18n.xml.
build-i18n.xml.
7. At the end of this short howto, we should speak about special situations and a few hints, you should consider:
- double quotation marks inside a string must be escaped with a backslash: msgstr "... \" ..."
- single quotation marks must be doubled (two single quotation marks) for Java texts (#, java-format)
- #, fuzzy means that the translation string is outdated (e.g. the original string changed) - in this situation, check your translation and adjust it if necessary - then you can remove the fuzzy string (e.g. line #, fuzzy, java-format becomes #, java-format)
Translating the Applet-, User- and Developers-Guide
The guides are written in XML. ...
1. First install and download:
- Python runtime
- libxml2-python bindings (Windows-port)
- gettext (Windows-port) - see also the first paragraphs in Translating the application/applet
- gnome-doc-utils - only Linux users, the Python scripts in Jmol-HEAD\doc\source are (only!) for Windows users
Note for Linux users: Linux users should ALWAYS try to use their package management to install (software-)packages.
Note for Windows users: Windows users MUST add an environment variable PYTHON_PATH, which contains the directory where you installed Python, e.g. set PYTHON_PATH=C:\Program Files\Python24.
Now you are done with the prerequisites.
2. All targets related to internationalisation and localisation of the documentation are part of ![]() build-doc-i18n.xml. To create PO-template files, run ant -f build-doc-i18n.xml create-pot. All
build-doc-i18n.xml. To create PO-template files, run ant -f build-doc-i18n.xml create-pot. All ![]() Jmol*Guide.LANG.po files (which contain the translation and are maintained by the translator himself) are updated with ant -f build-doc-i18n.xml update-po. To create the final (translated) XML file
Jmol*Guide.LANG.po files (which contain the translation and are maintained by the translator himself) are updated with ant -f build-doc-i18n.xml update-po. To create the final (translated) XML file ![]() Jmol*Guide_LANG.docbook.xml, run ant -f build-doc-i18n.xml update-xml.
Jmol*Guide_LANG.docbook.xml, run ant -f build-doc-i18n.xml update-xml.
3. To create a translation in your language, go to doc/source/po and copy ![]() Jmol*Guide.pot to
Jmol*Guide.pot to ![]() Jmol*Guide.LANG.po - LANG means your language code: e.g. de for German, fr for French and so on.
Jmol*Guide.LANG.po - LANG means your language code: e.g. de for German, fr for French and so on.
4. The rest is similar to the above Howto.
Translating the Jmol and FAH websites
... to write
Contributors
NicolasVervelle, AngelHerraez, Vslavik, Pimpim, Bevmorguson, Cudo29

